Category Archives: Word

Word – Behavior When Pasting Sections

Note: This article’s solution was tested in Word 2016.

I recently discovered a curious behavior in Word when trying to solve a vexing problem with my firm’s third-party Word template add-in.

What happens when you paste in a section, including its section break? (not using the unformatted text option.)

The section you paste in

For starters, the section that you paste in should retain in the destination document the section properties that it had in its source document. The section properties generally include the things under the Layout > Page Setup group in the ribbon. It also includes the section’s headers and footers, unless the headers/footers are being replicated from a previous section.

How it affects other sections

What this post is more concerned with is what happens to the other sections in your destination document, specifically the headers and footers. Depending on settings in the headers and footers of your destination document, the sections following the pasted-in section may pick up the headers and footers of the pasted-in section.

Whether they do or not depends on a setting in each header and footer, which is the “Link to Previous” toggle button you see when you go into a header or footer.

It’s important to know, as I’ve stated (blog post on hidden headers/footers), that each section in a Word document has three headers and three footers. Each of those headers and footers has its own independent Link to Previous setting. So if the First Page header has Link to Previous turned on, it will replicate the First Page header of the previous section. Same for the Primary header, etc.

This setting comes into play when you do the paste. So if you want the new headers to propagate to the following section, make sure it is on in the headers/footers of the destination section.

Complication with the document’s first section

But there is a complication involving the first section in the destination document. The first section has no previous section, so if you look at the Link to Previous button, it is disabled, of course. You might think the setting is off, but no, the button is disabled because it’s irrelevant.

So what happens when you paste a section into the first section?

This is the strange behavior.

If there is no content in the first section headers/footers, then they will pick up from the pasted section, as if Link to Previous is on. But if there is already content in the headers/footers, they will not pick up, as if Link to Previous is off.

This seems like a sensible enough approach. To my knowledge it is not documented.

How I saved the firm

How did this relate to the vexing problem we were having?

The templates we were working with were pleadings, and one of our requirements for these particular templates was to have a TOC and a TOA section included. Our vendor’s code runs through numerous complicated procedures when initializing a pleading, to insert a caption, etc. They also have a standalone procedure to add TOC and TOA sections.

Our problem was that the main body section was getting the TOA section’s headers.

The template starts with only the main body section—no cover page or TOC/TOA. The rest is added by the setup code. What I discovered during testing, by observing the undo/redo history, was that the cover, TOC and TOA sections were apparently being added through a paste operation in code. (The add-in is compiled VSTO, and I did not have access to the vendor’s code. But the undo history had a “VBA.Paste” at the point where the added sections appeared.)

So, I knew about Link to Previous and I started experimenting, wondering what would happen to the first section. I thought it would be odd that Link to Previous would be true on the first section, but experimenting with blank documents confirmed that it was, or acted that way.

I then put some content into the headers and saw the opposite result. So the solution to our problem was simply to put some content—a space character—into the headers of the templates.

Pleadings getting TOA headers in the main body was completely unacceptable. However, the same pleading templates had worked previously. Apparently, the vendor’s code corrected the main body headers after the paste operation, and something in the new build was breaking that. My initial solution was to write VBA to do what supposedly the vendor’s code had done previously—unlink and clear the headers, but this was complicated and less than satisfactory. I kept going back to it and trying to figure something out. Then I had the long night looking at the undo history and came up with the space character solution.

My recent employment has included a lot of this kind of detective work. It’s hard, hair-pulling stuff, but it’s great to isolate a problem and solve it.

Word – Styles and Numbering Are Two Different Things

When you contact Document Support for an issue with numbering in Word, do they talk about “styles”? Does it seem that they might be confusing things? If so, your suspicions are correct.

Quick question: What is a “style” in Word?

If you were to ask typical legal Word users, you’d probably get a lot of different answers. Some might vaguely indicate formatting; some might say something about automatic numbers. More knowledgeable users would say that styles allow you to do multiple things at once.

A style in Word is simply a set—a set of options that apply to a particular element. For example, a paragraph style is a set of options that apply to paragraphs.1 Paragraphs can be formatted using several options, such as indentation, line spacing, space before and after, a default font, etc. With a style, you group a set of values for these options together, give it a name, and then you can apply those options to paragraphs all at once.

1 Word also has styles for characters, tables, lists, etc. Styles aren’t just for paragraphs.

Now, of course, paragraphs can be numbered. So…

Question 2: Is numbering part of a paragraph style?

The answer is No. This may be a surprise to a lot of Word users. The fact is, you can apply numbering by using paragraph styles, but the numbering is not part of the style. You can link a numbered list and a paragraph style (so that you get the number by applying the style), but list formatting and paragraph formatting are two different things in Word.

As with many topics, it helps to have a programming perspective. In the Word programming object model, there are List objects and related objects that deal with numbering. Paragraph and ParagraphFormat objects deal with paragraph formatting.

From a user perspective, numbering is controlled through the various numbering dialogs, not the paragraph dialog.

Why is this important?

  1. Because numbering can be done in ways other than through paragraph styles, and it’s essential to know how to work with numbering in general, rather than through the limited functionality provided by linking numbering to paragraph styles.
  2. Because, if you’re a support person, you want know what you’re talking about. If you say “styles” (sets) when you mean “numbering” (numbering), you’re not making sense.

A lot of traditional document support users are trained to apply numbering only through linked paragraph styles. This limited training leads to a lot of ineffective help desk support and wasted document support time. A modern document support professional needs to understand Word numbering at a higher level. For instance:

  • to fix problems quickly, without resorting to wholesale reformatting
  • to handle documents with unfamiliar numbering (e.g., documents from other firms)
  • to handle documents with complex or multiple outlines
  • to create customized numbered lists

All these challenges are easily within the grasp of a document services professional with a modern skill set.

Kenneth Hester is a Microsoft Office Specialist Master (2013, 2010, 2007, 2003) and a Microsoft Certified Application Developer.

Word – Using Fields to Automate Inline Numbering

In this post, I’ll demonstrate how to automate the numbering of inline lists (lists inside a paragraph). I’ll also explain how to avoid an easy pitfall.

Inline lists

Legal documents often feature numbered lists of items within a paragraph, such as:

2.1 Sale and Purchase. The Seller agrees to (a) ______; (b) ______; and (c) ______.

Usually, these are manually typed, which is usually easy and good enough. If, however, you have a document with lots of these lists, or long lists, and the document is getting edited, you might want to automate the list numbering. The way you do this is with field codes. The question is, which field code to use?

You might think the ListNum field is the answer; however the Seq (Sequence) field is probably the better choice. ListNum can mess up your paragraph outline numbering.

The ListNum field

ListNum uses numbers from the outline that you’re in (unless you choose one of the named lists). So, if you’re in a document with heading numbering like “Article I/1.1/(a)/(i)…”—a common legal outline, and you’re in a level 2 paragraph, a ListNum field will give you “(a)” (the next level) by default. Legal document specialists are accustomed to using ListNum fields to handle one particular situation: where you have a number of lower-level paragraphs, but the first one is joined with the higher-level paragraph, e.g.:

2.1 (a) The Seller agrees…

(b) Seller further agrees…

ListNum is perfect for that one scenario; however, that’s different from our problem, which is independent lists of items within a paragraph. If, say, you wanted to follow your level 2 paragraph with some level 3 paragraphs:

2.1 Sale and Purchase. The Seller agrees to (a) ______; (b) ______; and (c) ______.

(a) The Seller will …

(b) The Purchaser will …

you’d find that your first level 3 paragraph will be numbered (d), not (a), because you’ve already used (a), (b) and (c) from your outline.

Also, if, say, you had used ListNum level 4:

The Seller agrees to (i) ______; (ii) ______; and (iii) ______.

your following level 3 paragraph will be (b), not (a), because in outline logic, you can’t be at level 4 unless you’ve crossed level 3. Using the level 4 ListNum field thus increments the counter on level 3.

Note that although you can manually reset the level 3 paragraph number to (a), you really don’t want to—essentially, this makes a second list, which can lead to unexpected results, especially when the outline numbering is connected to paragraph styles, as is usually the case in legal documents.

You can get away with using ListNum fields, but only if you don’t follow them with lower-level numbered paragraphs.

The Seq field

The Seq field is designed for sequences, which is exactly what we have. It also features a lot of options that make it very powerful. In particular, one option we’ll find convenient is that the sequence can be related to the outline, without using numbers from the outline like ListNum.

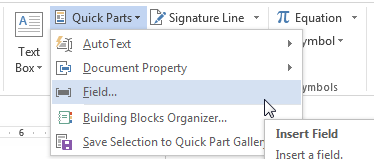
You can set up a sequence by going to Insert > Quick Parts > Field:

This brings up the Field dialog. Choose “Seq” from the list. On the right, you can see “SEQ” in the Field codes: text box. We need to give the sequence an identifier (you can have multiple sequences in a document). Let’s just call this one “abc,” so type “abc” next to SEQ.

We’re also going to set a couple of options, so click Options, which brings up the Field Options dialog. On the General Switches tab, under Formatting:, choose “a, b, c, …”, then click the Add to Field button. Under the Field Specific Switches tab, choose “\s” (which causes the sequence numbering to restart after a specified heading level) and click Add to Field. Type “2” after the \s, because we want the sequence to restart with each Heading 2. We end up with this:

You can put spaces around the elements to make it more readable, like I did. Also, you don’t need to go through these dialog boxes. When you get accustomed to working with fields, you will probably find it easier to just insert a basic field, then type the switches etc. inside it.

Click OK in both dialogs and Word puts an automatic “a” in your paragraph. You can type parens around it and copy and paste it, or maybe add it to your building blocks collection (Quick Parts > Save Selection to Quick Part Gallery…) to use it throughout your document. If you add it to your building blocks, you can use it on other documents as well.

Note, remember with fields, you need to update them to see results as you’re working—select all, then F9.

In this way, you’ll have a simple, reliable way to automate your inline lists that won’t mess up your paragraph numbering. You could create another sequence in the same manner for a “(i), (ii), (iii)” sequence, etc.

The Seq field is very powerful, as you will find if you explore its options. It’s one of many powerful field codes used in Word. Understanding and using field codes and switches is part of being a Word expert and practicing the modern approach to legal document support.

For more in-depth information from Microsoft, see these articles:

Kenneth Hester is a Microsoft Office Specialist Master (2013, 2010, 2007, 2003) and a Microsoft Certified Application Developer.

Word – Understanding the Table of Authorities Feature

Note: This article applies to Word versions 2007 to 2013.

Skip to:

Word TOAs: Overview

As a lawyer or other legal professional, you may be reluctant to mark your briefs for tables of authorities, thinking it’s difficult. In actuality, it’s pretty easy, and anyone who can understand a brief and has some basic computer skills can do it.

Microsoft Word’s TOA feature reflects the concepts used in citing authorities—the full, well-formed citation, a short form of the cited authority, and a category to place the authority in.

The tools for marking citations and inserting the table are on the References tab, in the Table of Authorities group:

Table of Authorities group on ribbon

You click Mark Citation to bring up a dialog box that you use to mark cites. Then, when you’re ready to insert the TOA, click Insert Table of Authorities.

Word’s user interface could be much better. The Mark Citation dialog box is not initially easy to understand:
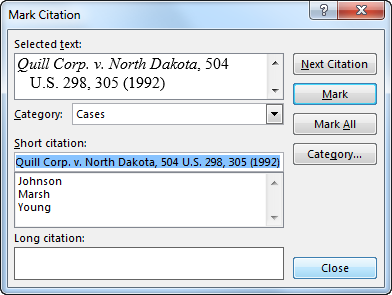
Mark Citation dialog

Explanation of the dialog box

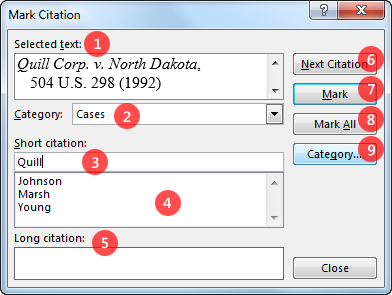
Here is what each element of the dialog box is for. What you’re doing is creating a list of authorities that is stored in the document, each with a long (full) form, a short form, and a category:
Mark Citation dialog annotated

1. Selected text: You select a cite in the document and this  box initially displays the text you have selected. You edit the text in this box (which doesn’t change the document text) to create the full form of the TOA entry (how you want it to appear in the TOA) the first time you mark a particular authority. For instance, you insert a line break after the case name and delete the pin cite, as shown here.

2. Category: Assign a category to the authority.

3. Short citation: Like the Selected text box, this box initially displays the text you have selected. You edit this text to create the short form of the authority (used for your own reference for future cites, i.e., the short form that is used in the brief).

As you add authorities, each short citation is added to the list box (4.) below this text box. Later, when you want to mark a subsequent cite to an authority that you have already marked, you select the cite in the brief, then select the short citation from this list box and click Mark. (There’s a shortcut for this, which I discuss below.)

5. Long citation: This box displays the long citation that corresponds to a short citation that you have selected in the list of short citations, which can be helpful in refreshing your memory about a cite or checking for other issues.

Note, since the dialog box isn’t resizable, the Long citation box won’t display all of a lengthy citation.

6. Next Citation: Don’t use this. It doesn’t work (it uses pattern matching to find things that look like cites, but it is no substitute for reading).

7. Mark: Click this when you have finished the text box edits (for an initial cite) or selected the short citation (for a subsequent cite), and are ready to mark the cite.

8. Mark All: Will mark all instances of text matching the short citation. It’s doubtful you’d want to do this. It apparently just looks for the exact word(s) you chose as the short citation.

9. Category: Displays a list of available categories and allows you to customize categories.

Now, most people are probably unlikely to understand all of that at the first glance of this little dialog box. And Microsoft’s help doesn’t go into this detail.

But once you understand what you’re doing, and have some basic keyboard and mouse skills (discussed below), you’ll fly through a TOA job.

Tips for using Word’s TOA tool

Here are a few tips you can follow to make the use of the Word tool easier:

1. Keep the dialog box open.

You don’t need to close the Mark Citation dialog after you mark a cite. Keep it open next to your document window (don’t maximize the Word window if you’re using only one monitor). The dialog box will refresh when you click on it. Scroll through your document, select your cites, then work with the dialog box.

2. Use good basic keyboarding techniques.

The line break after the case name is Shift+Enter (in Windows).

Learn how to move around and select text: use combinations of the shift, control, arrow, home and end keys (combinations that are fairly universal in Windows programs) to move and select text quickly in various ways, e.g., to delete all the text after the short citation.

The arrow up and down keys are also convenient for scrolling through the list of short citations.

3. Shortcut for subsequent cites

When marking a subsequent citation to an authority already in your list, if the text you have selected matches exactly a short cite in the short cite list (ok to have spaces on either side), you can go straight from selecting the text to clicking Mark—no need to locate it in the list. (If you click the dialog box to refresh it, you should see that the short cite is already selected in the list, and the category is grayed out.)

Fixing mistakes

Some easy mistakes to make are: assigning the wrong category; not formatting the long citation completely; not editing the short citation completely. These can all be fixed easily by editing the field codes that the TOA tool generates.

Understanding Word’s field codes

Word marks a cite by inserting a “field code” (or “field”) into the document text. The field code’s font is formatted as “hidden,” so you need to make sure you are viewing hidden characters by toggling the Show/Hide button on:
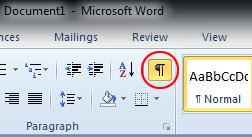
Show/Hide button

Word calls the fields used to mark cites “TA” fields. (The “TOA” field is the TOA table.) Here are a TA field for an initial cite:

Field code for initial cite

and one for a subsequent cite:

Field code for subsequent cite

I’ll explain the elements of the initial cite field:
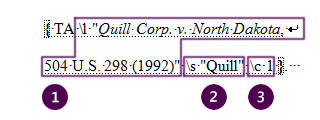
Field code for initial cite annotated

1. The long form of the citation (as you edited it in the Selected Text box). This is preceded by an “\l” switch.

Switches are codes for settings that control the field code’s behavior. They are preceded by a backslash.

2. The short form of the citation, preceded by an “\s” switch.

3. The category (as a numeral), preceded by a “\c” switch.

You can edit any of these items simply by typing inside the field code. For example, if you forgot to insert a line break after the case name, insert it here.

If you assigned the wrong category, just change the “\c” number to the correct one. The numbers correspond to the position of each category in the Categories dropdown in the dialog box (or you can examine another field code to find the correct number).

The changes you make to the initial cite field code will be reflected in the dialog box the next time you click on it to refresh it.

If you want to edit the short citation, there is an additional complication if you marked any subsequent cites using the short form you now want to change. You’ll need to find those other cites and edit them or re-mark them. They won’t change automatically.

Also, since these fields contain a short citation form that now does not correspond to any authority’s full form, if you find one in the list of short citations, the Long Citation text box will show “Authority not available” and the cite will not be included in the table. In fact, this is a good quality check: scroll through the list of short citations and make sure each is associated with a correct long citation.

Custom categories

If you want to use categories that aren’t in your built-in category list, it certainly can be done, but you need to be aware of a complication if you intend to share your document with another user (e.g., your staff or a colleague).

Custom categories created through the Mark Citation dialog are saved in your user profile, so they are user-level settings, not document-level. They are not saved with the document, and will not travel with the document to another user. There is a workaround, however, for making a custom category TOA shareable, and you may consider it to be a best practice for any custom category TOA.

Let’s use the example that you want to separate state cases from federal cases, and want to have a custom category for each. We’ll look at the non-sharing and sharing scenarios.

Scenario 1: You are the only user

If you do not intend to have another user work with the Word document, creating custom categories through the Mark Citation dialog is pretty straightforward. Click the Category button, which launches a separate Edit Category dialog:
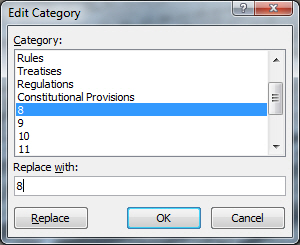
Edit Category dialog

In the Category list, go down to where the list changes from named categories to numbers. (It’s better to use the numbered, unnamed categories than to overwrite and lose an already-named category.) Select one of the numbers, type the new category name in the Replace with box and click the Replace button (you need to click Replace, not just OK). Repeat this for any more custom categories you want, then click OK to close this dialog.

Let’s say you replaced “8” with “Federal Cases.” Now, using the Mark Citation dialog, you’ll see “Federal Cases” in the 8th position of the dropdown, and your field codes for federal cases will indicate “\c 8″. When you generate your TOA, Word will include the heading “Federal Cases” for this category.

Your custom categories will remain available for other documents in Word.

Scenario 2: You need to share the document with other editors

Since custom categories are not a document-level setting, other editors of your document will not see them when marking cites, and when they update the TOA, the heading “Federal Cases” in Scenario 1 will revert to “8.” But there is a fairly simple workaround. The strategy is to use the numbered categories, as in Scenario 1; however, you’ll prevent Word from generating the heading, and instead you’ll type the heading manually.

First, mark your cites using the numbered categories. (You can rename the categories as in Scenario 1, to help yourself remember which number goes with which custom category, but it’s not necessary.) Then, generate your TOA. The heading, whether it’s “Federal Cases” or “8,” will be generated.

The workaround at this point requires making a simple edit in the TOA field code (not the TA field shown above, but the actual table). First, understand that each category of your TOA is generated as a separate TOA field code. (That’s why, for instance, when you right-click on the Cases section and update the field, Statutes and other categories don’t update.) The field starts at the heading and goes to the last entry in the list of authorities for that category.

Note: You should have Show/Hide toggled to Hide when updating a TOA or TOC, to ensure the page numbers are correct.

What you’ll do is edit the custom category field by taking out the switch that tells Word to automatically generate the heading. At the top of the field (before the “8” heading), hit enter once or twice to give yourself space for the new heading. Right-click the category field, and select “Toggle Field Codes”:
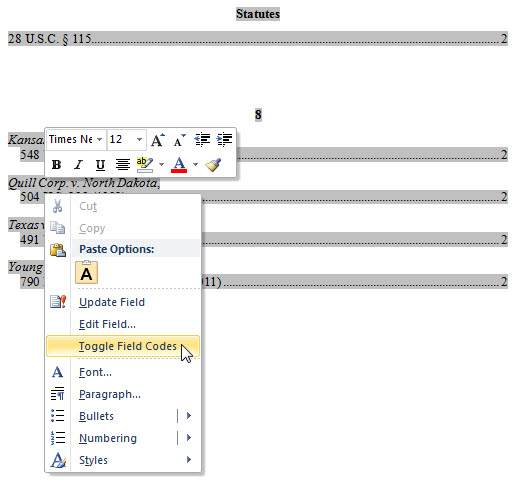
TOA toggle field code

You’ll see the field code with its switches:

TOA field code with switches

The “\h” switch, included by default, is responsible for the heading (the name of the category) being generated. You simply delete this switch from the code:

TOA field code without h switch

Right-click and update the field, and you’ll see the list of authorities, but no heading. Simply type your own heading for the custom category.

I hope this quick primer answered some questions and helped allay any qualms you might have about running your own TOAs.

Kenneth Hester is a Microsoft Office Specialist Master (2013, 2010, 2007, 2003) and a Microsoft Certified Application Developer.
Numbering in Word – Think About Document Structure

In Part 1, I outlined a few of the challenges with automatic numbering in Word that trip up traditional document support users. These examples included:

  • Over-reliance on and conflation with paragraph styles
  • Handling multiple, independent lists
  • Handling separate outlines in exhibits or schedules

I’d like to step back now and observe the more general problem that underlies all of these failures. The problem is not thinking about the document structure. People are so focused on getting a number that looks right, they’re not seeing the big picture, which is the document itself, not the numbering.

Word supports numbering in many ways, with many options. The people who developed Word weren’t trying to overwhelm or confuse future users, they were trying to support the many ways documents are structured.

Agreement numbering

Let’s take an example – an agreement. Typically, an agreement is numbered in an outline form, such as:

ARTICLE I
REPRESENTATIONS

1.1 Representations of the Seller. The Seller represents that:

(a) blah blah blah blah blah blah blah blah blah blah blah blah blah blah blah blah blah blah blah blah blah blah blah blah blah blah blah blah blah blah blah blah blah blah blah.

(b) blah blah blah blah blah blah blah blah blah blah blah blah blah blah blah blah blah blah blah blah blah blah blah blah blah blah blah blah blah blah blah blah blah blah.

Typically, legal documents like this will use Word’s heading styles (which are paragraph styles1) to apply the outline numbering. “Article I” is Heading 1, “1.1” is Heading 2, “(a)” is Heading 3, etc.

1 Heading styles are actually linked styles, not just paragraph styles, but they must be used as paragraph styles to get numbers.

That’s pretty standard and simple. So, anybody see a problem with it?

Well, the (a) and (b) paragraphs aren’t headings, are they? We’re calling them “Heading 3″? And only part of the 1.1 paragraph is a heading.

So, even at this elementary level, we’re already ignoring document structure – calling the paragraphs something they’re not – in the quest to get a number in front of them.

Well, Ken, are you suggesting that the profession abandon using heading styles for agreements?

No, it’s too ingrained and convenient. It’s a convention. But I’m saying you should think about what you’re doing in terms of document structure. Users have been trained to work with these imperfections, and have done it for so long, that they don’t think about it. And that’s what leads to problems.

Let’s say further down this agreement there’s something like this:

7.2 Something. Seller will do something under these conditions:

a) something;
b) something;
c) something.

Except that if

1) something;
2) something;
3) something,

Uh oh! The heading styles don’t use “a)” or “1)” formats at that level! What to do? A lot of users are so knee-jerked into heading styles, they’ll modify the heading outline to make some of the heading style levels use these formats with this indent level. And, to avoid messing up the work they’ve done previously in the document, which probably uses several heading levels, they’ll assign it to a lower, so far unused level, like 7 or 8. And they end up with an outline that looks like this:

Is that ridiculous? Yes, that is ridiculous. For one thing, that is saying that those items are at the 7th and 8th level of the outline, which, clearly, they’re not. And if you happen to get to the actual level 7 in your main outline, then you’ve got a conflict. Not to mention that skipping levels (from 2 to 7) flies in the face of the concept of outlining.

The better way to approach this problem is to think about the document structure. The “a), b) c), except 1), 2) 3)” part doesn’t fit with the “ARTICLE I, 1.1, (a), (i)” numbering, and it isn’t serving the same purpose as those main paragraphs. It’s just a list of things within a main section and it happens to be numbered. It’s not part of the main (heading styles) outline, so don’t try to shoehorn it into that outline.

Word allows you to have any number of numbered lists in a document. The main heading outline is only one list. If this particular kind of list is infrequently used in the document, you can just use the numbering buttons to apply the numbering. This creates a standalone list.2 Or, if it recurs, you can create a list style (which I discussed in Part 1).

2 There are some technical issues with using the numbering buttons, which I will address in a future post.

The “a), b) c), except 1), 2) 3)” idiom is fairly common, and users complain that it’s “inconsistent numbering,” which gives them a hard time. Well, it’s not inconsistent numbering. It’s separate numbered lists (separate from the main document outline). Separate lists give users a hard time, if they don’t think about document structure enough to recognize a separate list.

Offering memoranda

I return to the example from Part 1 of the Offering Memorandum. The Description of [Securities] sections in these documents feature lots of independent lists. (I’ll call it description of notes or DoN.) For example:

Covenants

This covenant will not prohibit the Incurrence of…

(1) Indebtedness Incurred by…

(2) the incurrence of intercompany…

(a) if the Issuer is the lender…

(b) if the Issuer or a Guarantor is…

For purposes of determining…

(1) in the event…

(2) all Indebtedness…

The first “(1), (2)” list is separate from the second one. If you’re not thinking about document structure, you might not recognize or care that they’re separate lists. If you’re only thinking about the numbering, and are (as is typical) over-relying on paragraph styles for numbering, you end up groping for unused heading styles, or “List Number” type paragraph styles, and/or restarting the numbering over and over. Plus, if the lists vary in numbering format, you might run out of styles.

Or you may try to use something like “definition” styles. In a typical definition style numbering scheme, the first level of the numbering outline is actually not numbered. The purpose of this is to support the typical list of definitions, where the definition paragraphs are not numbered, but they may be followed by “(a), (b), (c)” type lists. The reason the non-numbered paragraphs are included in the numbering outline is to use the option to “restart” the numbering of Level 2 paragraphs after each Level 1 paragraph.

It looks like this:

This is a useful, though somewhat problematic, solution for definitions sections. One problem with it is that it makes navigating the paragraphs with the keyboard more difficult (because Word treats each definition paragraph as numbered, even though there’s no number—as you navigate from paragraph to paragraph with the control and arrow keys, you get an unwanted extra stop on each definition paragraph).

Using this kind of numbering for a description of notes section can work, but if you actually use the styles called “Definition,” you’re calling things that aren’t definitions “definitions.” Again, ignoring the document structure.

A better idea may be to create an outline similar to definitions outlines, but use style names more semantically appropriate for a description of notes. But it’s not quite the same as a definitions section because the paragraphs in a DoN don’t serve as unique a purpose as definition paragraphs. They’re really just body text, some of which happen to set off lists. So you’ll have paragraphs that are serving the same purpose called different styles. You’re inventing a style, or class, of paragraph that is defined only by the fact that it sets off a list.

Moreover, the many DoN lists are often inconsistently formatted, and may differ from the definition numbering.

My suggestion for DoNs, as discussed in Part 1, is to use list styles, not paragraph styles. List styles are only concerned with numbering, so you won’t be changing the paragraph styles to something that clashes with the document structure.

Schedules/exhibits

A schedule or exhibit is clearly separate from the main document in terms of structure. So, again, you don’t want to use a list from the main document. It’s a separate outline. Use a separate outline in Word.

Conclusion

Numbering, really, is not structure. It’s just enumerating things. The things are part of a logical structure, and the way they’re numbered should follow that structure.

If it’s the main document outline, use the main outline numbering. A separate outline, a different numbered outline. A one-off list? Simple direct numbering. Numerous similar independent lists? Separate lists using a list style.

Kenneth Hester is a Microsoft Office Specialist Master (2013, 2010, 2007, 2003) and a Microsoft Certified Application Developer.

Word – Watch Out for Hidden Headers and Footers

Here’s a simple question: You open a one-page Word document. How many headers and footers does it have?

The answer, surprisingly, is three headers and three footers.1 It’s always three. And you very well might not be able to see the content in all of them.

There is 1) the “primary” header and footer, 2) the “first page” header and footer, and 3) the “even pages” header and footer. The primary footer is the default for every page in the section. (I’ll discuss headers and footers interchangeably; the same points apply to both.) The “first page” is a different footer, optionally shown for the first page in the section (often used in legal documents). The even pages footer, similarly, is optionally shown for the even-numbered pages (used for book-type publications).

Note I said optionally shown, not optionally included, because you can’t delete them. (You can delete their contents, of course.)

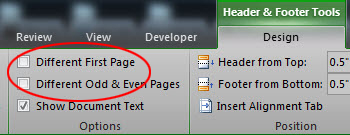
Every section in every Word document has all three headers and footers. This is important to understand. When you uncheck these two boxes:

…you’re not deleting anything. You’re only hiding those different headers/footers (i.e., from the printout and print layout view), and they can be un-hidden later.

This issue came to light recently when working with a client who had based a document on a form, and needed to remove the form’s artifacts. The document looked fine on his computer, but when he opened it on a tablet… what the? … There was the form header, right on the front page.

Apparently, the tablet app didn’t use the same logic as the PC app as far as displaying headers, and it was showing the first page header, which had been unchecked and thus hidden … on the PC. Yikes.

Another pitfall scenario: A section with “Different First Page” checked that has only one page. There, you can’t see the primary footer.

What to do to avoid such problems? Obviously, the best practice is to start with a good, trusted template. If you must use an unknown template, a good metadata tool should check for hidden headers/footers. Or your modern legal support professional could write some simple code to inspect all header and footer content.

You could check them all manually by adding page breaks to every section if needed, so that there are at least three pages in each, then going through the headers and footers and checking both boxes for each section (obviously easier if you delete all the content so you start with only one section).

You can also use Find and Replace if you’re looking for something specific. Word will find the content in the hidden headers/footers. But of course, it won’t find something you don’t know to look for.

1 This is demonstrable in the VBE (Visual Basic Editor). Execute:

print selection.sections(1).footers.count

It’ll always be three.

Kenneth Hester is a Microsoft Office Specialist Master (2013, 2010, 2007, 2003) and a Microsoft Certified Application Developer.

Deleting a Section Break in Word (and Preserving Your Formatting)

Have you had the delightful experience of deleting an unwanted section break in a Word document, and then seeing your formatting go to pieces?

This unexpected result is due to a counterintuitive relationship between sections and section breaks. Essentially, the section break relates to the section above it, not the section below it. (See, e.g., this Microsoft support article.) So, when you delete the break, you’re removing the formatting of the section above (which is what you probably want to keep), and retaining the formatting of the section below instead.

The solution for retaining the formatting of the section above is, therefore, to format the section below to be identical to the section above. That sounds easy, but unfortunately, a lot goes into section formatting—page size and orientation, margins, headers and footers, page borders, etc. So, if you look online for how to accomplish this, you find disappointing solutions involving many steps.

The easy way to do it is to run some code that does all the work for you. My code below will make it quick and painless. What it does is assign the pertinent properties of the section above to the section below, plus it copies the headers and footers and even the page borders to the section below. So, when you then delete your section break, you keep your current section’s formatting.

Note: If you don’t have experience running custom code in Word, there are plenty of easy guides out there, e.g., this one. Or I may write a new post on that.

So, install the macro code below (copy it to your Normal or some other template). Put your cursor in the section above the break, and run the “PrepareToDeleteSectionBreak” macro. You’ll see your next section assume the correct formatting. You can then safely delete the section break.

Modern Legal Support provides programming examples for illustration only, without warranty either expressed or implied, including, but not limited to, the implied warranties of merchantability and/or fitness for a particular purpose. Always back up your documents before running any code.

' Code by Kenneth A. Hester
' www.modernlegalsupport.com

' PrepareToDeleteSectionBreak()
' Sets the following section's
' (and section's child objects') properties
' equal to the current section's,
' so that the break can be deleted
' without losing the current section's
' formatting.

Public Sub PrepareToDeleteSectionBreak()
    Dim s1 As Section
    Dim s2 As Section
    
    Set s1 = Selection.Sections(1)
    Set s2 = ActiveDocument.Sections(s1.Index + 1)
    
    DuplicatePageSetupProperties s1, s2
    DuplicateColumnProperties s1, s2
    DuplicateBorderProperties s1, s2
    DuplicateHeadersAndFooters s1, s2
    DuplicatePageNumbers s1, s2
    
    Set s1 = Nothing
    Set s2 = Nothing
    
    MsgBox "You may now delete the section break.", vbOKOnly, "Delete Section Break || modernlegalsupport.com"
End Sub

Private Sub DuplicatePageSetupProperties(s1 As Section, s2 As Section)
    With s2.PageSetup
        ' first set up the size properties (some other properties depend on these)
        .Orientation = s1.PageSetup.Orientation
        .PageHeight = s1.PageSetup.PageHeight
        .PageWidth = s1.PageSetup.PageWidth
        
        .TopMargin = s1.PageSetup.TopMargin
        .BottomMargin = s1.PageSetup.BottomMargin
        .LeftMargin = s1.PageSetup.LeftMargin
        .RightMargin = s1.PageSetup.RightMargin
        .FooterDistance = s1.PageSetup.FooterDistance
        .HeaderDistance = s1.PageSetup.HeaderDistance
        .MirrorMargins = s1.PageSetup.MirrorMargins
        
        .VerticalAlignment = s1.PageSetup.VerticalAlignment
        
        .Gutter = s1.PageSetup.Gutter
        .GutterPos = s1.PageSetup.GutterPos
        .GutterStyle = s1.PageSetup.GutterStyle
        
        .FirstPageTray = s1.PageSetup.FirstPageTray
        .OtherPagesTray = s1.PageSetup.OtherPagesTray
        .LineNumbering = s1.PageSetup.LineNumbering
        .SectionDirection = s1.PageSetup.SectionDirection
        .SuppressEndnotes = s1.PageSetup.SuppressEndnotes
        .TwoPagesOnOne = s1.PageSetup.TwoPagesOnOne
        
        .DifferentFirstPageHeaderFooter = s1.PageSetup.DifferentFirstPageHeaderFooter
        .OddAndEvenPagesHeaderFooter = s1.PageSetup.OddAndEvenPagesHeaderFooter
        
        .SectionStart = s1.PageSetup.SectionStart
    End With
End Sub

Private Sub DuplicateColumnProperties(s1 As Section, s2 As Section)
    Dim i As Long
    
    With s2.PageSetup.TextColumns
        .SetCount s1.PageSetup.TextColumns.Count
        .EvenlySpaced = s1.PageSetup.TextColumns.EvenlySpaced
        .FlowDirection = s1.PageSetup.TextColumns.FlowDirection
        .LineBetween = s1.PageSetup.TextColumns.LineBetween
    
        If s1.PageSetup.TextColumns.Count > 1 Then
            For i = 1 To .Count
                .Item(i).Width = s1.PageSetup.TextColumns(i).Width
                If i < .Count Then
                    .Item(i).SpaceAfter = s1.PageSetup.TextColumns(i).SpaceAfter
                End If
            Next i
        End If
    End With
End Sub

Private Sub DuplicateBorderProperties(s1 As Section, s2 As Section)
    Dim i As Long
    
    For i = 1 To s2.Borders.Count
        With s2.Borders(i)
            .LineStyle = s1.Borders(i).LineStyle
            If .LineStyle <> wdLineStyleNone Then
                .LineWidth = s1.Borders(i).LineWidth
                .ArtStyle = s1.Borders(i).ArtStyle
                .ArtWidth = s1.Borders(i).ArtWidth
                .Color = s1.Borders(i).Color
                .Visible = s1.Borders(i).Visible
            End If
        End With
    Next i
    
    With s2.Borders
        .AlwaysInFront = s1.Borders.AlwaysInFront
        .DistanceFrom = s1.Borders.DistanceFrom
        .DistanceFromBottom = s1.Borders.DistanceFromBottom
        .DistanceFromLeft = s1.Borders.DistanceFromLeft
        .DistanceFromRight = s1.Borders.DistanceFromRight
        .DistanceFromTop = s1.Borders.DistanceFromTop
        '.Enable = s1.Borders.Enable ' Don't use - sets the line style to the default line style and sets the line width to the default line width. (See MSDN)
            ' Also see shaunakelly.com/word/layout/page-borders.html - setting applies to all sections
        .EnableFirstPageInSection = s1.Borders.EnableFirstPageInSection
        .EnableOtherPagesInSection = s1.Borders.EnableOtherPagesInSection
        '.JoinBorders = s1.Borders.JoinBorders ' apparent bug: removes borders from other sections
        '.SurroundFooter = s1.Borders.SurroundFooter ' apparent bug: removes borders from other sections
        '.SurroundHeader = s1.Borders.SurroundHeader  ' apparent bug: removes borders from other sections
    End With
End Sub

Private Sub DuplicateHeadersAndFooters(s1 As Section, s2 As Section)
    ' first link to previous (to copy them), then duplicate setting
    Dim i As Long
    
    For i = 1 To 3
        s2.Headers(i).LinkToPrevious = True
        s2.Headers(i).LinkToPrevious = s1.Headers(i).LinkToPrevious
        
        s2.Footers(i).LinkToPrevious = True
        s2.Footers(i).LinkToPrevious = s1.Footers(i).LinkToPrevious
    Next i
End Sub

Private Sub DuplicatePageNumbers(s1 As Section, s2 As Section)
    ' PageNumbers behaves like a property of the Section object, not a HeaderFooter object.
    ' If you change one property for one HeaderFooter.PageNumbers,
    ' it changes the same property for all other HeaderFooters.
    ' Therefore, only need to apply to one HeaderFooter object
    With s2.Footers(1).PageNumbers ' 1 is primary
        .NumberStyle = s1.Footers(1).PageNumbers.NumberStyle
        .RestartNumberingAtSection = s1.Footers(1).PageNumbers.RestartNumberingAtSection
        If .RestartNumberingAtSection Then
            .StartingNumber = s1.Footers(1).PageNumbers.StartingNumber
        End If
        If s1.Footers(1).PageNumbers.IncludeChapterNumber Then
            .IncludeChapterNumber = True
            .HeadingLevelForChapter = s1.Footers(1).PageNumbers.HeadingLevelForChapter
            .ChapterPageSeparator = s1.Footers(1).PageNumbers.ChapterPageSeparator
        Else
            .HeadingLevelForChapter = 0
            .IncludeChapterNumber = False
        End If
        .DoubleQuote = s1.Footers(1).PageNumbers.DoubleQuote
    End With
End Sub

Note, this code is not just a line-for-line enumeration of all the section properties. I’ve deliberately left some out and commented out others. This is because it won’t work if you apply some of these, or apply them in the wrong order. Also, as noted in comments, there are some buggy behaviors in Word VBA that I’ve had to discover and work around. Also, of course, this won’t work on a protected document.

Thinking of sections brings to mind some other issues. Stay tuned for a post on headers and footers that will include an important security issue, and an executive summary of how headers and footers work in Word. [Edit: Here is that post.]

Kenneth Hester is a Microsoft Office Specialist Master (2013, 2010, 2007, 2003) and a Microsoft Certified Application Developer.

Numbering in Word – Part 1

As a legal document user, you’ve probably run into more than a few issues with automatic numbering. Plus, if you’ve tried to get a traditional staff support person to fix those issues, you have probably been disappointed.

This post examines a few common situations where the modern support model beats the traditional model in the context of Word numbering.

The usual problem: multiple lists

Typical legal documents with numbering are agreements and pleadings. These documents often have a single numbering outline (a single “list,” in Word) that covers the entire document. E.g., an agreement’s outline might look like “Article 1 / 1.1 / (a) / (i)” etc.

Users are generally trained to apply this kind of numbering through the use of paragraph styles that are linked to an outline numbered list. So, for instance, applying the Heading 1 style would give you the “Article 1″ numbering, Heading 2, the “1.1,” etc. It works because the firm’s template links the styles to the outline.

Note that almost all users use the term “styles” to mean paragraph styles. There are other types of styles; later in this post, I will discuss “list styles,” which are a good solution that most users are unaware of.

In Word, a “style” is a set of formatting attributes. You can apply the formatting attributes individually, or in groups through styles. That’s all that a Word “style” is—a set.

Although you get numbering through applying paragraph styles in this manner, paragraph styles and numbering are separate things. Numbering is not an attribute of a paragraph in Word’s programming model. A “paragraph” is one thing; a “list” is another. The reason you get the numbering by applying the style is that you can create a connection between the two through the numbering dialog. In programming-speak, you’re assigning the style as the “LinkedStyle” property for a level in a list template. The firm’s template creators set up the templates to do this.

The problem is, many traditional users conflate paragraph styles and numbering (often referring to them interchangeably and thinking that, for instance, the “1.1” is part of the definition of the Heading 2 style). The user is hard-pressed to use numbering outside of this limited scenario. In fact, it is not necessary at all to use paragraph styles to get numbering. In many situations, it is counterproductive.

The most common of these situations is having multiple numbered lists in a document.

Offering memoranda

Numbering in an offering memorandum or prospectus—especially the Description of Notes (or other securities) section—challenges the paragraph styles-dependent user. Why? Because this section features many independent numbered lists. It will often look like:

Covenants

This covenant will not prohibit the Incurrence of…

(1) Indebtedness Incurred by…

(2) the incurrence of intercompany…

(a) if the Issuer is the lender…

(b) if the Issuer or a Guarantor is…

For purposes of determining…

(1) in the event…

(2) all Indebtedness…

In concept, and therefore in good practice, the second numbered list is not connected to the first one. They are separate lists. However, in Word numbering applied through paragraph styles (what many users are limited to), each paragraph style can only be connected to one list. So, in the example, if a paragraph style was being used to apply the “(1)” level, at the second list, applying that style would give you “(3),” not another “(1).” It would continue the same level of the same list.

In order to get each list to restart at 1, you would need to either manually reset the number to 1 each time, or use the arguably inelegant solution of creating a set of paragraph styles connected to an outline where the first level is not numbered (“This covenant will not prohibit the Incurrence of…” is level 1, and “(1)” is level 2, etc.). Some firms do this with Definitions sections. This solution works mechanically, but it suffers logically here, because these paragraphs are not distinct enough to merit a paragraph style. They’re merely body text, or bullet points. No one would think to give them a set of styles, were it not for the numbering.

List styles

A better solution for this scenario is using list styles, which, as I stated earlier, most users are unaware of, despite throwing the word “styles” around unceasingly.

A list style applies to—wait for it—lists! Not paragraphs. A “list” in Word meaning the numbering associated with a set of numbered or bulleted items. A list style applies to multiple lists the same way that a paragraph style applies to multiple paragraphs. So, in the offering memorandum example, where the problem is multiple lists, it’s the perfect solution.

A list style includes definitions for the numbering format: the type of number and its position for each level of an outline. To some extent, it overlaps paragraph style formatting, but only with regard to indentation.

It’s really obvious when you think about it. The main concept to conquer is thinking of lists as individual entities in the same way you think of paragraphs. Each can be controlled by “styles,” but they’re different types of styles. Use of the word “styles” without qualification is an unfortunate source of confusion. Also, list styles are not indicated in the user interface as clearly as paragraph styles are. You get to list styles through the multilevel list button.

Exhibits and schedules

Another situation where multiple lists confuse the traditional user is where exhibits or schedules use numbering that is separate from the main document.

Firms may have schemes that include separate paragraph styles for use in schedules. The issue, though, is often that the single set of styles is insufficient for multiple, different schedules. The traditional user is forced to change the numbers or their formatting to match the firm’s template, or give up and just use manual numbering.

The skilled user can create new outlines to handle each schedule. The programmer can write code to do so, saving invaluable time.

Examples of Complex Problems, Real Solutions – Part 1

In the traditional legal office environment, attorneys generally relied on secretarial and document support staff to do the work of creating and editing documents, which was considered a clerical task. As attorneys increasingly became computer users, they relied on the same staff for assistance with the more technical issues that complex software presents. Predictably, this didn’t work, and secretarial and document support staff numbers have diminished greatly.

In today’s environment, many attorneys have reasonably good computer skills; however, most are not “techies.” With modern office programs, there are tremendous opportunities for efficiency, but to know many of them and to be truly efficient requires being a techie.

A person with real technical skills as well as document skills is much more valuable than a traditional document support staffer. This post examines a few examples of situations where this is evident.

Examples

Numbering in Word

Numbering paragraphs in Word has vexed many people over the years. The simple fact is that it is a complex subject. There are so many ways that someone might want to number items in a document, and so many ways that Word supports numbering, that the interface cannot effectively present them all.

Traditionally, a firm’s technology department would set up a few numbering schemes that are common in that firm’s documents, and train the users to apply the numbering using the firm’s unique method. The users could thus handle the customary documents.

Now, however, it is common for attorneys to share documents with clients and with other attorneys from different firms. Since different firms have different methods of applying numbering, users face unfamiliar schemes.

To meet this challenge requires understanding how numbering works in Word, which is, as I’ve stated, a complex topic. Many traditional support staff users simply cannot handle it, telling attorneys that a document must be reformatted to the firm’s template, or that the document is “corrupt” or “unstable,” or some such excuse.

Understanding Word numbering requires study and training in how software works—data structures, lists, objects, etc. A highly skilled person who has studied computer science and Word can handle the challenges that numbering presents.

See separate blog post on numbering for more detail.

Find and replace using patterns

Word has a feature in its Find and Replace function called “wildcards.” It is infinitely useful in common document editing scenarios, yet it is almost completely unknown and likely unknowable to the traditional document support staffer.

Wildcards are a way of finding and replacing using patterns, rather than literal text. You search for a pattern, and replace, optionally preserving part of the specific text you find.

Since a pattern will cover many text items, it’s a way of doing multiple things at once.

Examples of where wildcards can dramatically improve efficiency:

  • Cleaning up a document converted from PDF. These documents have paragraphs broken up by hard returns in the middle of sentences (among other recurring patterns). A wildcard expression (representing the pattern of a character not typically found at the end of a paragraph—e.g., not a period or semicolon—followed by a paragraph mark) can be used to find and fix these.
  • Spaces. A wildcard can match extra spaces or not enough spaces. You don’t need to look for, literally, “two spaces.” You can look for “two or more” or “less than two.” (Examples: 1. You want two spaces at the end of sentences. Look for [period][one space][capital letter]; replace with [period][two spaces][the capital letter you found]. 2. You want to remove extra spaces in mid-sentence. Look for [not a period][two or more spaces]; replace with [the not-a-period you found][one space].)
    Without using wildcards, this stuff is maddeningly repetitive. You can hear traditional word processors hacking away at their keyboards for long stretches. “Whack!-boom-boom. Whack!-boom-boom. Whack!-boom-boom. Whoops!” That’s what it sounds like.
  • Defined terms. A wildcard expression can represent a pair of quotation marks and the text between them. (Advanced: I’ve written macros to find all quoted terms in a document, and format them, or output the terms and their locations to another document, which can be used as a helper in checking the defined terms.)

There are many other situations where wildcards are useful, many of which will be specific to a particular document. Being able to think in wildcards is invaluable, in terms of both speed and accuracy.

Track changes

Track Changes is another tremendously useful and efficient feature in Word that is underused in firms, likely due to skills limitations. Like numbering and wildcards, it is complex enough that it is optimally suited for educated users. Computer science knowledge (particularly the concepts of objects and scope) helps in mastering it.

When you use track changes, Word keeps track of the type of change you made (insertion, deletion, formatting, etc.), when you made it, and who made it (using the author information that is set at the scope, or level, of the entire MS Office suite).

Track changes are stored in the document as “Revision” objects. They contain the who-what-when data outlined above. What they do not contain, unlike simpler comparison programs, is presentation information, i.e., the color and other appearance attributes of the tracking itself, seen on screen and in print. This formatting is generated by the Word program at runtime, based on user-level settings (set through the Track Changes Options dialog box).

Therefore, it is a mistake to think that track changes in any document will look the same to another user. Don’t say, “My changes are in red,” or something like that. Understand that each user has the ability to view changes their own way. The data in the track changes, however (who, what, when), is always there.

Unlike a simple redline from a comparison program, you can get markup from numerous colleagues, and review and accept or reject each item of markup, all without disturbing the format of your document. Not disturbing the format also means you don’t need to keep markup out of your main document and duplicate changes from a redline. Just version up and do markup directly in the document.

Converting documents

Converting a document (typically from a PDF) involves so many skills, it is a tour de force for a truly skilled person. Even though you might consider it low-end as far as document work, the difference between the modern approach and the traditional approach will result in significant time savings.

(Advanced: One of the primary time drains in converting documents is reapplying character-level formatting after the plain text of the original is pasted into the new document. I’ve written code that preserves the character-level formatting without bringing over any of the paragraph-level formatting.)

Programming perspective

Almost everything in Word that can be done from the user interface can also be done from a programming interface, and, not surprisingly, much faster.

All of the above examples—numbering, wildcards, track changes, conversions—can be programmed to a great extent. Someone who understands the software and the document requirements, as well as knows how to program, can do such things as:

  • Create numbering outlines on the fly (where a document requires more than one simple list), or edit an existing outline;
  • Programmatically find and replace text, including patterns;
  • Manipulate track changes (e.g., accept all changes from a certain time frame, reject all changes for certain sections, etc.);
  • Automate much of the conversion process.

There are many more examples of the vast benefits of the modern model. More on this soon.