Note: This article applies to Word versions 2007 to 2013.
Skip to:
Word TOAs: Overview
As a lawyer or other legal professional, you may be reluctant to mark your briefs for tables of authorities, thinking it’s difficult. In actuality, it’s pretty easy, and anyone who can understand a brief and has some basic computer skills can do it.
Microsoft Word’s TOA feature reflects the concepts used in citing authorities—the full, well-formed citation, a short form of the cited authority, and a category to place the authority in.
The tools for marking citations and inserting the table are on the References tab, in the Table of Authorities group:

You click Mark Citation to bring up a dialog box that you use to mark cites. Then, when you’re ready to insert the TOA, click Insert Table of Authorities.
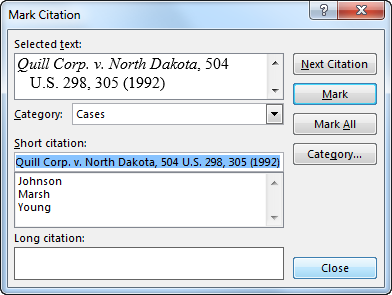
Word’s user interface could be much better. The Mark Citation dialog box is not initially easy to understand:
Explanation of the dialog box
Here is what each element of the dialog box is for. What you’re doing is creating a list of authorities that is stored in the document, each with a long (full) form, a short form, and a category:
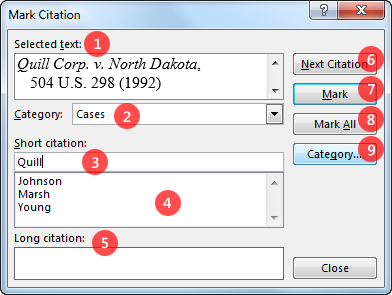
1. Selected text: You select a cite in the document and this box initially displays the text you have selected. You edit the text in this box (which doesn’t change the document text) to create the full form of the TOA entry (how you want it to appear in the TOA) the first time you mark a particular authority. For instance, you insert a line break after the case name and delete the pin cite, as shown here.
2. Category: Assign a category to the authority.
3. Short citation: Like the Selected text box, this box initially displays the text you have selected. You edit this text to create the short form of the authority (used for your own reference for future cites, i.e., the short form that is used in the brief).
As you add authorities, each short citation is added to the list box (4.) below this text box. Later, when you want to mark a subsequent cite to an authority that you have already marked, you select the cite in the brief, then select the short citation from this list box and click Mark. (There’s a shortcut for this, which I discuss below.)
5. Long citation: This box displays the long citation that corresponds to a short citation that you have selected in the list of short citations, which can be helpful in refreshing your memory about a cite or checking for other issues.
Note, since the dialog box isn’t resizable, the Long citation box won’t display all of a lengthy citation.
6. Next Citation: Don’t use this. It doesn’t work (it uses pattern matching to find things that look like cites, but it is no substitute for reading).
7. Mark: Click this when you have finished the text box edits (for an initial cite) or selected the short citation (for a subsequent cite), and are ready to mark the cite.
8. Mark All: Will mark all instances of text matching the short citation. It’s doubtful you’d want to do this. It apparently just looks for the exact word(s) you chose as the short citation.
9. Category: Displays a list of available categories and allows you to customize categories.
Now, most people are probably unlikely to understand all of that at the first glance of this little dialog box. And Microsoft’s help doesn’t go into this detail.
But once you understand what you’re doing, and have some basic keyboard and mouse skills (discussed below), you’ll fly through a TOA job.
Tips for using Word’s TOA tool
Here are a few tips you can follow to make the use of the Word tool easier:
1. Keep the dialog box open.
You don’t need to close the Mark Citation dialog after you mark a cite. Keep it open next to your document window (don’t maximize the Word window if you’re using only one monitor). The dialog box will refresh when you click on it. Scroll through your document, select your cites, then work with the dialog box.
2. Use good basic keyboarding techniques.
The line break after the case name is Shift+Enter (in Windows).
Learn how to move around and select text: use combinations of the shift, control, arrow, home and end keys (combinations that are fairly universal in Windows programs) to move and select text quickly in various ways, e.g., to delete all the text after the short citation.
The arrow up and down keys are also convenient for scrolling through the list of short citations.
3. Shortcut for subsequent cites
When marking a subsequent citation to an authority already in your list, if the text you have selected matches exactly a short cite in the short cite list (ok to have spaces on either side), you can go straight from selecting the text to clicking Mark—no need to locate it in the list. (If you click the dialog box to refresh it, you should see that the short cite is already selected in the list, and the category is grayed out.)
Fixing mistakes
Some easy mistakes to make are: assigning the wrong category; not formatting the long citation completely; not editing the short citation completely. These can all be fixed easily by editing the field codes that the TOA tool generates.
Understanding Word’s field codes
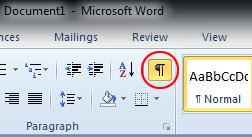
Word marks a cite by inserting a “field code” (or “field”) into the document text. The field code’s font is formatted as “hidden,” so you need to make sure you are viewing hidden characters by toggling the Show/Hide button on:
Word calls the fields used to mark cites “TA” fields. (The “TOA” field is the TOA table.) Here are a TA field for an initial cite:

and one for a subsequent cite:

I’ll explain the elements of the initial cite field:
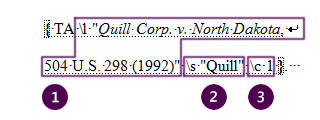
1. The long form of the citation (as you edited it in the Selected Text box). This is preceded by an “\l” switch.
Switches are codes for settings that control the field code’s behavior. They are preceded by a backslash.
2. The short form of the citation, preceded by an “\s” switch.
3. The category (as a numeral), preceded by a “\c” switch.
You can edit any of these items simply by typing inside the field code. For example, if you forgot to insert a line break after the case name, insert it here.
If you assigned the wrong category, just change the “\c” number to the correct one. The numbers correspond to the position of each category in the Categories dropdown in the dialog box (or you can examine another field code to find the correct number).
The changes you make to the initial cite field code will be reflected in the dialog box the next time you click on it to refresh it.
If you want to edit the short citation, there is an additional complication if you marked any subsequent cites using the short form you now want to change. You’ll need to find those other cites and edit them or re-mark them. They won’t change automatically.
Also, since these fields contain a short citation form that now does not correspond to any authority’s full form, if you find one in the list of short citations, the Long Citation text box will show “Authority not available” and the cite will not be included in the table. In fact, this is a good quality check: scroll through the list of short citations and make sure each is associated with a correct long citation.
Custom categories
If you want to use categories that aren’t in your built-in category list, it certainly can be done, but you need to be aware of a complication if you intend to share your document with another user (e.g., your staff or a colleague).
Custom categories created through the Mark Citation dialog are saved in your user profile, so they are user-level settings, not document-level. They are not saved with the document, and will not travel with the document to another user. There is a workaround, however, for making a custom category TOA shareable, and you may consider it to be a best practice for any custom category TOA.
Let’s use the example that you want to separate state cases from federal cases, and want to have a custom category for each. We’ll look at the non-sharing and sharing scenarios.
Scenario 1: You are the only user
If you do not intend to have another user work with the Word document, creating custom categories through the Mark Citation dialog is pretty straightforward. Click the Category button, which launches a separate Edit Category dialog:
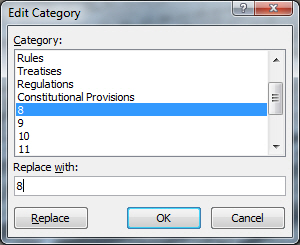
In the Category list, go down to where the list changes from named categories to numbers. (It’s better to use the numbered, unnamed categories than to overwrite and lose an already-named category.) Select one of the numbers, type the new category name in the Replace with box and click the Replace button (you need to click Replace, not just OK). Repeat this for any more custom categories you want, then click OK to close this dialog.
Let’s say you replaced “8” with “Federal Cases.” Now, using the Mark Citation dialog, you’ll see “Federal Cases” in the 8th position of the dropdown, and your field codes for federal cases will indicate “\c 8″. When you generate your TOA, Word will include the heading “Federal Cases” for this category.
Your custom categories will remain available for other documents in Word.
Scenario 2: You need to share the document with other editors
Since custom categories are not a document-level setting, other editors of your document will not see them when marking cites, and when they update the TOA, the heading “Federal Cases” in Scenario 1 will revert to “8.” But there is a fairly simple workaround. The strategy is to use the numbered categories, as in Scenario 1; however, you’ll prevent Word from generating the heading, and instead you’ll type the heading manually.
First, mark your cites using the numbered categories. (You can rename the categories as in Scenario 1, to help yourself remember which number goes with which custom category, but it’s not necessary.) Then, generate your TOA. The heading, whether it’s “Federal Cases” or “8,” will be generated.
The workaround at this point requires making a simple edit in the TOA field code (not the TA field shown above, but the actual table). First, understand that each category of your TOA is generated as a separate TOA field code. (That’s why, for instance, when you right-click on the Cases section and update the field, Statutes and other categories don’t update.) The field starts at the heading and goes to the last entry in the list of authorities for that category.
Note: You should have Show/Hide toggled to Hide when updating a TOA or TOC, to ensure the page numbers are correct.
What you’ll do is edit the custom category field by taking out the switch that tells Word to automatically generate the heading. At the top of the field (before the “8” heading), hit enter once or twice to give yourself space for the new heading. Right-click the category field, and select “Toggle Field Codes”:
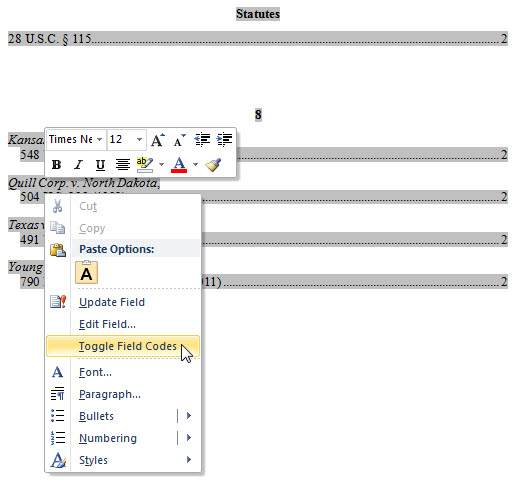
You’ll see the field code with its switches:

The “\h” switch, included by default, is responsible for the heading (the name of the category) being generated. You simply delete this switch from the code:

Right-click and update the field, and you’ll see the list of authorities, but no heading. Simply type your own heading for the custom category.
I hope this quick primer answered some questions and helped allay any qualms you might have about running your own TOAs.
Kenneth Hester is a Microsoft Office Specialist Master (2013, 2010, 2007, 2003) and a Microsoft Certified Application Developer.
I still cannot get the page numbers in my TOA to correctly update and the show/hide is off
Thank you very much for being one of the very few people who went into deep detail on this topic. This is actually a powerful feature that is very poorly understood.