Category Archives: VBA

Excel – Use Grouping to Show Tree Structure

Great tool for data room indexes

The other day at the office, I had an interesting request. An attorney had an Excel index from a data room, and wanted to use Excel’s grouping feature to represent the file/folder structure.

The data room, as is typical, had an index column that used a string concatenated from integers to represent file and folder location. For instance, “1,” “2,” “3” etc. are the top-level folders. “1.1” may be a subfolder or a file under folder 1, etc.:

What the attorney wanted was to have the grouping “plus signs” at each folder level, grouping the files and subfolders below that folder.

I came up with the solution using VBA code and one helpful setting in Excel. First, the setting. Excel by default places the summary rows (i.e., the plus signs) below the detail, or group. In this application, we want the plus signs above the group. To allow this, click the dialog launcher under Data > Outline and uncheck “Summary rows below detail.” This is a worksheet-level setting, so it will stick with your sheet.
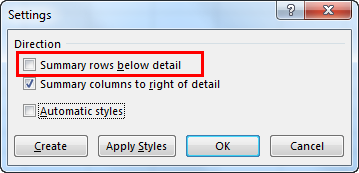
Another issue to be aware of: Your index column should be formatted as text, so that, for instance, “1.20” does not come into Excel as “1.2” etc. “1.20” in a data room index means the 20th item under 1, but if your cell is formatted as General, Excel will treat it as a number and drop the insignificant zero.

Also be aware that Excel gives you a maximum of 8 grouping levels, so this solution won’t cover grouping deeper levels than that.

Now for the code. It’s fairly compact and quick to run. It determines the level of the current record by the number of tokens in the index string, then applies logic based on the current record’s relation to what has come before it in the loop, grouping at each level in the tree.

Modern Legal Support provides programming examples for illustration only, without warranty either expressed or implied, including, but not limited to, the implied warranties of merchantability and/or fitness for a particular purpose. Always back up your documents before running any code.

Option Explicit
 
' Code by Kenneth A. Hester
' www.modernlegalsupport.com

Sub GroupFoldersByLevel()
    Dim i As Long
    Dim r As Range
    Dim rStart As Range
    Dim rEnd As Range
    Dim foundStart As Boolean
    Dim rngGroup As Range
    Dim level As Long
    Dim maxLevel As Long
    Dim levelAtRow As Long
    Dim indexColumn As Long
    Dim fileFolderColumn As Long
    Dim startRow As Long
    Dim atEndRow As Boolean
   
    ' ----------------------
    ' set these values based on your worksheet:
    maxLevel = 7
    indexColumn = 1
    fileFolderColumn = 3
    startRow = 3
    ' ----------------------
   
    For level = 1 To maxLevel
        DoEvents
        Debug.Print "Processing level " & CStr(level) & "..."
        
        foundStart = False
        For i = startRow To ActiveSheet.UsedRange.Rows.Count + 1
            Set r = ActiveSheet.Rows(i)
            atEndRow = (i = ActiveSheet.UsedRange.Rows.Count + 1) ' close off last groups at end row
            
            ' determine level of current row based on number of tokens in index:
            levelAtRow = UBound(Split(CStr(r.Cells(indexColumn).Value), ".")) + 1
            
            If levelAtRow <= level Or atEndRow Then
            ' found a file or folder at or above the level
                If Not foundStart Then
                ' then we found the start of a group
                    If levelAtRow = level And Trim$(LCase$(r.Cells(fileFolderColumn).Value)) = "folder" Then
                        ' it's a folder at the level
                        Set rStart = r.Offset(1) ' start grouping the files below the folder
                        foundStart = True
                    End If
                Else ' already found start of the group, so now we found the end
                    Set rEnd = r.Offset(-1)
                    If Not rStart.Row > rEnd.Row Then ' this takes care of empty folders
                        Set rngGroup = Range(rStart, rEnd) ' close the group
                        rngGroup.Rows.Group
                    End If
                    If levelAtRow = level And Trim$(LCase$(r.Cells(fileFolderColumn).Value)) = "folder" Then
                        ' if the end is the start of another folder at the level
                        ' reset the start row
                        Set rStart = r.Offset(1)
                        foundStart = True
                    Else
                        foundStart = False
                    End If
                    'Exit Sub
                End If
            End If
        Next i
    Next level
    
    Debug.Print "done."
End Sub

After running the code:

You can download my Excel test file with the code here.

Have fun. Let me know if it works for you.

Kenneth Hester is a Microsoft Office Specialist Master (2013, 2010, 2007, 2003) and a Microsoft Certified Application Developer.

Deleting a Section Break in Word (and Preserving Your Formatting)

Have you had the delightful experience of deleting an unwanted section break in a Word document, and then seeing your formatting go to pieces?

This unexpected result is due to a counterintuitive relationship between sections and section breaks. Essentially, the section break relates to the section above it, not the section below it. (See, e.g., this Microsoft support article.) So, when you delete the break, you’re removing the formatting of the section above (which is what you probably want to keep), and retaining the formatting of the section below instead.

The solution for retaining the formatting of the section above is, therefore, to format the section below to be identical to the section above. That sounds easy, but unfortunately, a lot goes into section formatting—page size and orientation, margins, headers and footers, page borders, etc. So, if you look online for how to accomplish this, you find disappointing solutions involving many steps.

The easy way to do it is to run some code that does all the work for you. My code below will make it quick and painless. What it does is assign the pertinent properties of the section above to the section below, plus it copies the headers and footers and even the page borders to the section below. So, when you then delete your section break, you keep your current section’s formatting.

Note: If you don’t have experience running custom code in Word, there are plenty of easy guides out there, e.g., this one. Or I may write a new post on that.

So, install the macro code below (copy it to your Normal or some other template). Put your cursor in the section above the break, and run the “PrepareToDeleteSectionBreak” macro. You’ll see your next section assume the correct formatting. You can then safely delete the section break.

Modern Legal Support provides programming examples for illustration only, without warranty either expressed or implied, including, but not limited to, the implied warranties of merchantability and/or fitness for a particular purpose. Always back up your documents before running any code.

' Code by Kenneth A. Hester
' www.modernlegalsupport.com

' PrepareToDeleteSectionBreak()
' Sets the following section's
' (and section's child objects') properties
' equal to the current section's,
' so that the break can be deleted
' without losing the current section's
' formatting.

Public Sub PrepareToDeleteSectionBreak()
    Dim s1 As Section
    Dim s2 As Section
    
    Set s1 = Selection.Sections(1)
    Set s2 = ActiveDocument.Sections(s1.Index + 1)
    
    DuplicatePageSetupProperties s1, s2
    DuplicateColumnProperties s1, s2
    DuplicateBorderProperties s1, s2
    DuplicateHeadersAndFooters s1, s2
    DuplicatePageNumbers s1, s2
    
    Set s1 = Nothing
    Set s2 = Nothing
    
    MsgBox "You may now delete the section break.", vbOKOnly, "Delete Section Break || modernlegalsupport.com"
End Sub

Private Sub DuplicatePageSetupProperties(s1 As Section, s2 As Section)
    With s2.PageSetup
        ' first set up the size properties (some other properties depend on these)
        .Orientation = s1.PageSetup.Orientation
        .PageHeight = s1.PageSetup.PageHeight
        .PageWidth = s1.PageSetup.PageWidth
        
        .TopMargin = s1.PageSetup.TopMargin
        .BottomMargin = s1.PageSetup.BottomMargin
        .LeftMargin = s1.PageSetup.LeftMargin
        .RightMargin = s1.PageSetup.RightMargin
        .FooterDistance = s1.PageSetup.FooterDistance
        .HeaderDistance = s1.PageSetup.HeaderDistance
        .MirrorMargins = s1.PageSetup.MirrorMargins
        
        .VerticalAlignment = s1.PageSetup.VerticalAlignment
        
        .Gutter = s1.PageSetup.Gutter
        .GutterPos = s1.PageSetup.GutterPos
        .GutterStyle = s1.PageSetup.GutterStyle
        
        .FirstPageTray = s1.PageSetup.FirstPageTray
        .OtherPagesTray = s1.PageSetup.OtherPagesTray
        .LineNumbering = s1.PageSetup.LineNumbering
        .SectionDirection = s1.PageSetup.SectionDirection
        .SuppressEndnotes = s1.PageSetup.SuppressEndnotes
        .TwoPagesOnOne = s1.PageSetup.TwoPagesOnOne
        
        .DifferentFirstPageHeaderFooter = s1.PageSetup.DifferentFirstPageHeaderFooter
        .OddAndEvenPagesHeaderFooter = s1.PageSetup.OddAndEvenPagesHeaderFooter
        
        .SectionStart = s1.PageSetup.SectionStart
    End With
End Sub

Private Sub DuplicateColumnProperties(s1 As Section, s2 As Section)
    Dim i As Long
    
    With s2.PageSetup.TextColumns
        .SetCount s1.PageSetup.TextColumns.Count
        .EvenlySpaced = s1.PageSetup.TextColumns.EvenlySpaced
        .FlowDirection = s1.PageSetup.TextColumns.FlowDirection
        .LineBetween = s1.PageSetup.TextColumns.LineBetween
    
        If s1.PageSetup.TextColumns.Count > 1 Then
            For i = 1 To .Count
                .Item(i).Width = s1.PageSetup.TextColumns(i).Width
                If i < .Count Then
                    .Item(i).SpaceAfter = s1.PageSetup.TextColumns(i).SpaceAfter
                End If
            Next i
        End If
    End With
End Sub

Private Sub DuplicateBorderProperties(s1 As Section, s2 As Section)
    Dim i As Long
    
    For i = 1 To s2.Borders.Count
        With s2.Borders(i)
            .LineStyle = s1.Borders(i).LineStyle
            If .LineStyle <> wdLineStyleNone Then
                .LineWidth = s1.Borders(i).LineWidth
                .ArtStyle = s1.Borders(i).ArtStyle
                .ArtWidth = s1.Borders(i).ArtWidth
                .Color = s1.Borders(i).Color
                .Visible = s1.Borders(i).Visible
            End If
        End With
    Next i
    
    With s2.Borders
        .AlwaysInFront = s1.Borders.AlwaysInFront
        .DistanceFrom = s1.Borders.DistanceFrom
        .DistanceFromBottom = s1.Borders.DistanceFromBottom
        .DistanceFromLeft = s1.Borders.DistanceFromLeft
        .DistanceFromRight = s1.Borders.DistanceFromRight
        .DistanceFromTop = s1.Borders.DistanceFromTop
        '.Enable = s1.Borders.Enable ' Don't use - sets the line style to the default line style and sets the line width to the default line width. (See MSDN)
            ' Also see shaunakelly.com/word/layout/page-borders.html - setting applies to all sections
        .EnableFirstPageInSection = s1.Borders.EnableFirstPageInSection
        .EnableOtherPagesInSection = s1.Borders.EnableOtherPagesInSection
        '.JoinBorders = s1.Borders.JoinBorders ' apparent bug: removes borders from other sections
        '.SurroundFooter = s1.Borders.SurroundFooter ' apparent bug: removes borders from other sections
        '.SurroundHeader = s1.Borders.SurroundHeader  ' apparent bug: removes borders from other sections
    End With
End Sub

Private Sub DuplicateHeadersAndFooters(s1 As Section, s2 As Section)
    ' first link to previous (to copy them), then duplicate setting
    Dim i As Long
    
    For i = 1 To 3
        s2.Headers(i).LinkToPrevious = True
        s2.Headers(i).LinkToPrevious = s1.Headers(i).LinkToPrevious
        
        s2.Footers(i).LinkToPrevious = True
        s2.Footers(i).LinkToPrevious = s1.Footers(i).LinkToPrevious
    Next i
End Sub

Private Sub DuplicatePageNumbers(s1 As Section, s2 As Section)
    ' PageNumbers behaves like a property of the Section object, not a HeaderFooter object.
    ' If you change one property for one HeaderFooter.PageNumbers,
    ' it changes the same property for all other HeaderFooters.
    ' Therefore, only need to apply to one HeaderFooter object
    With s2.Footers(1).PageNumbers ' 1 is primary
        .NumberStyle = s1.Footers(1).PageNumbers.NumberStyle
        .RestartNumberingAtSection = s1.Footers(1).PageNumbers.RestartNumberingAtSection
        If .RestartNumberingAtSection Then
            .StartingNumber = s1.Footers(1).PageNumbers.StartingNumber
        End If
        If s1.Footers(1).PageNumbers.IncludeChapterNumber Then
            .IncludeChapterNumber = True
            .HeadingLevelForChapter = s1.Footers(1).PageNumbers.HeadingLevelForChapter
            .ChapterPageSeparator = s1.Footers(1).PageNumbers.ChapterPageSeparator
        Else
            .HeadingLevelForChapter = 0
            .IncludeChapterNumber = False
        End If
        .DoubleQuote = s1.Footers(1).PageNumbers.DoubleQuote
    End With
End Sub

Note, this code is not just a line-for-line enumeration of all the section properties. I’ve deliberately left some out and commented out others. This is because it won’t work if you apply some of these, or apply them in the wrong order. Also, as noted in comments, there are some buggy behaviors in Word VBA that I’ve had to discover and work around. Also, of course, this won’t work on a protected document.

Thinking of sections brings to mind some other issues. Stay tuned for a post on headers and footers that will include an important security issue, and an executive summary of how headers and footers work in Word. [Edit: Here is that post.]

Kenneth Hester is a Microsoft Office Specialist Master (2013, 2010, 2007, 2003) and a Microsoft Certified Application Developer.